* * * Disclaimer * * *
- All material on this website is provided for your information only and may not be construed as medical advice or instruction. No action or inaction should be taken based solely on the contents of this information; instead, readers should consult appropriate health professionals on any matter relating to their health and well-being.
- The information and opinions expressed here are believed to be accurate, based on the best judgment available to the authors, and readers who fail to consult with appropriate health authorities assume the risk of any injuries. In addition, the information and opinions expressed here do not necessarily reflect the views of every contributor to Inner Peace Healing. Inner Peace Healing acknowledges occasional differences in opinion when it comes to the practice and instruction of self-care and stretches, and welcomes the exchange of different viewpoints. We are not responsible for errors or omissions.
- Not all exercises and stretches are suitable for everyone and this or any other exercise program may result in injury. Any user of this exercise program assumes the risk of injury resulting from performing the exercises, stretches and techniques suggested.
Keep checking back as we are always adding more information to help you stay healthy and pain free!
Stretching Protocol
- Position yourself for the stretch.
- Inhale.
- Exhale and stretch.
- As soon as you feel a slight stretch stop and hold. (If you feel any pain or discomfort stop, carefully reposition yourself making sure you are properly stabilizing and try again. If pain or discomfort persists discontinue the use of stretches and speak to your massage therapist/health care provider.)
- Hold for 2-3 seconds.
- Inhale and release to the starting position.
- Repeat 10-15 times.
* Remember stretching should not be painful, if you feel pain in the muscle you are stretching you have gone too far and the muscle will respond by tightening which is the opposite of your goal.
Pectoralis Major - stretching this muscle will take much of the strain off the upper back.
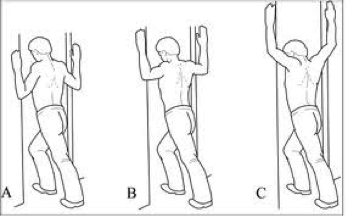
Find a doorway and use the above protocol to stretch your pecs.
A - Position your arms slightly below parallell to the floor and inhale. Exhale and lean forward, hold for 2-3 sec. when you feel a mild stretch. Inhale and release. Repeat 10 times.
B - Position your arms parallell to the floor and and inhale. Exhale and lean forward, hold for 2-3 sec. when you feel a mild stretch. Inhale and release. Repeat 10 times.
C - Position your arms slightly above parallel and inhale. Exhale and lean forward, hold for 2-3 sec. when you feel a mild stretch. Inhale and release. Repeat 10 times.
Do this 2-3 times each day. Avoid any positions that causes pain
Wall Angels (Upper Quarter Self-Stabilization Technique)
Benefits When performed daily, this movement reinforces retraction of the shoulder and neck muscles, stretching of the upper trapezius, and stabilization of the shoulder. It is ideally suited for easing strain caused by forward head, round shouldered posture. The beginning of upper quarter postural improvement is noticeable within two weeks, with cumulative effects thereafter.
Starting Position Stand with your feet 6 to 8 inches from the baseboard, your arms extended to shoulder level with your elbows bent, and your back pressed against the wall. Roll your pelvis backward so that your shoulders and head are also against the wall. Tuck your chin in order to lengthen your posterior neck muscles.
Actions 1. Raise your arms upward, keeping your wrists and elbows against the wall. Inhale as your arms stretch upward. 2. Pause briefly. 3. Exhale as you lower your elbows to your side at the level of your waistline. This action is the power stroke, so utilize a muscular contraction and consciously pull the elbows into your waistline, keeping them, as well as your wrists, as near to the wall as possible.
*Note: Always avoid any movement which causes pain.
Frequency Repeat up to 20 repetitions at a time when first learning the exercise, performing up to 100 repetitions daily. Perform the action slowly, and be conscious of contracting the external rotators, retractors, and depression of the shoulder. Once the exercise becomes easy, use a one to three pound weight for added resistance (a bottle of water, a can of soup works well).
Brueggers Position
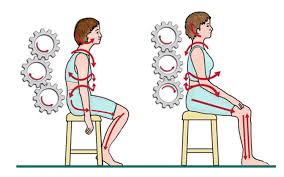
On the left, the woman is sitting with poor posture. The goal is to sit like the woman on the right. Here’s what to do:
Try doing the Pelvis, Mid Back, and Neck individually so you know what to. Hold each position for 8-10 seconds. When you are comfortable with each one, put them all together and hold for 8-10 seconds. You want do do the full exercise 3-4 times in a row with a short break(10-15 seconds) in between each.
Pelvis
1) While sitting at the front of your chair, roll your pelvis forward so you are sitting on your "sits" bones. (sit on your hand and rock your pelvis forward and back till you feel the bone.) You will feel the muscles on your low back tighten up.
Mid Back
1) Sit with your back as straight as possible, elongate your spine as if trying to extend it through the top of your head. your chest should elevate slightly.
2) With your arms hanging down by your side face your palms forward then rotate your arms at your soulders outward.
3) Squeeze your shoulder blades together – while together push them down to the floor. You will feel your muscles tighten between your shoulders.
Neck
1) Sit with your neck as straight as possible looking directly forward.
2) Push your chin straight back like you are trying to give yourself a double chin without bending your neck. You should feel a stretch or tightness on the upper 1/2 of the back of your neck.
These may seem small, but if done a few times a day, every day, it will help correct bad posture over time and some of the pain that goes with it.
Scott Sonnon Intuflow Joint Mobility
Part 1 Intuflow Joint Mobility Beginner - Part 1
Part 2 Intuflow Joint Mobility Beginner - Part 2
Part 3 Intuflow Joint Mobility Beginner - Part 3
Part 4 Intuflow Joint Mobility Beginner - Part 4
Part 5 Intuflow Joint Mobility Beginner - Part 5
Part 6 Intuflow Joint Mobility Beginner - Part 6
Intu-flow Joint Mobility Exercise
Neck (5) keep shoulders back down and relax
Rotation-guided by the cheekbone
Slide forward and down slide back tucking the chin
Glide side to side guide and by the mandible
Slide up with the chin rock back and tuck
Ear to shoulder lift up with cheek
Shoulder rolls (2) Keep shoulders down
Roll forward, up, back, down
Roll back, up, forward, down
Shoulder Swings (6) Do shallower circles
Side - Circle both directions
Cross body - circle opposite side - both directions - keep shoulder forward
Top circles - keep shoulder down - circle both directions
Bottom circles - keep pelvis out of way - use your body to swing your arm
Front circles - without twisting torso, circle in both directions
Back circles - circle both directions
Elbow (2) Both arms together
Extend, internal rotation, flexion
Flexion, external rotation, extension
Wrist (2) - Keep knuckles and elbow in same place. Move only the wrist
Top, outside, bottom, inside
Top, inside, bottom, outside
Fingers- start with the thumb circle each finger three times work your way to your pinky, then switch directions, circling each finger in the opposite direction from your pinky back to your thumb
Thorax (2)
Chest forward and lift, collapse and fold down
Fix hips, Glide spine, reach side to side
Pelvis and Lumbar (2)
Hip thrust, to sit squat (round front, arch back)
Put weight on one leg, sit and root, push hip out
Spine (3)
Down Dog - hips left and right to figure 8
Bend forward, arched back, fold at hips to come forward, squat roll pelvis
Side bends - Put weight on one leg, sit & root, push hip out, reach arm up and over head
Hips (3)
Flex and extend
Adduction and abduction
Internal rotation and external rotation
Knees (2)
Flex hip - flex and extend knee
Flex hip - knee rotation -heel inside and heel outside
Ankles (2)
Plantar flex and flex toes,
Dorsiflex and extend toes Inversion and eversion
4 C.B.D: Balancing Root -
1. Flex hip and knee. Extend knee and toes hold for 10 seconds
2. Lead with the heel and abduct the hip and externally rotate hold for 10 seconds
3. Bring the hip back into extension, knee extended, lean forward hold for 10 seconds
4. Flex hip and knee. Extend knee and toes hold for 10 seconds
5. Figure 4 - bring your ankle to your thigh, press and stretch hold for 10 seconds
Guided Meditation
Learn how to quiet your mind and ease into meditation with these guided meditations. Listen and sense, visualize or imagine the imagery as you follow along while gently sinking into relaxation.
learningmeditation.cohttp://www.abmp.com/members/webbuilder/page.php?id=204545m
Spleen 6 - Sanyinjiao (English translation: Three Yin Intersection)
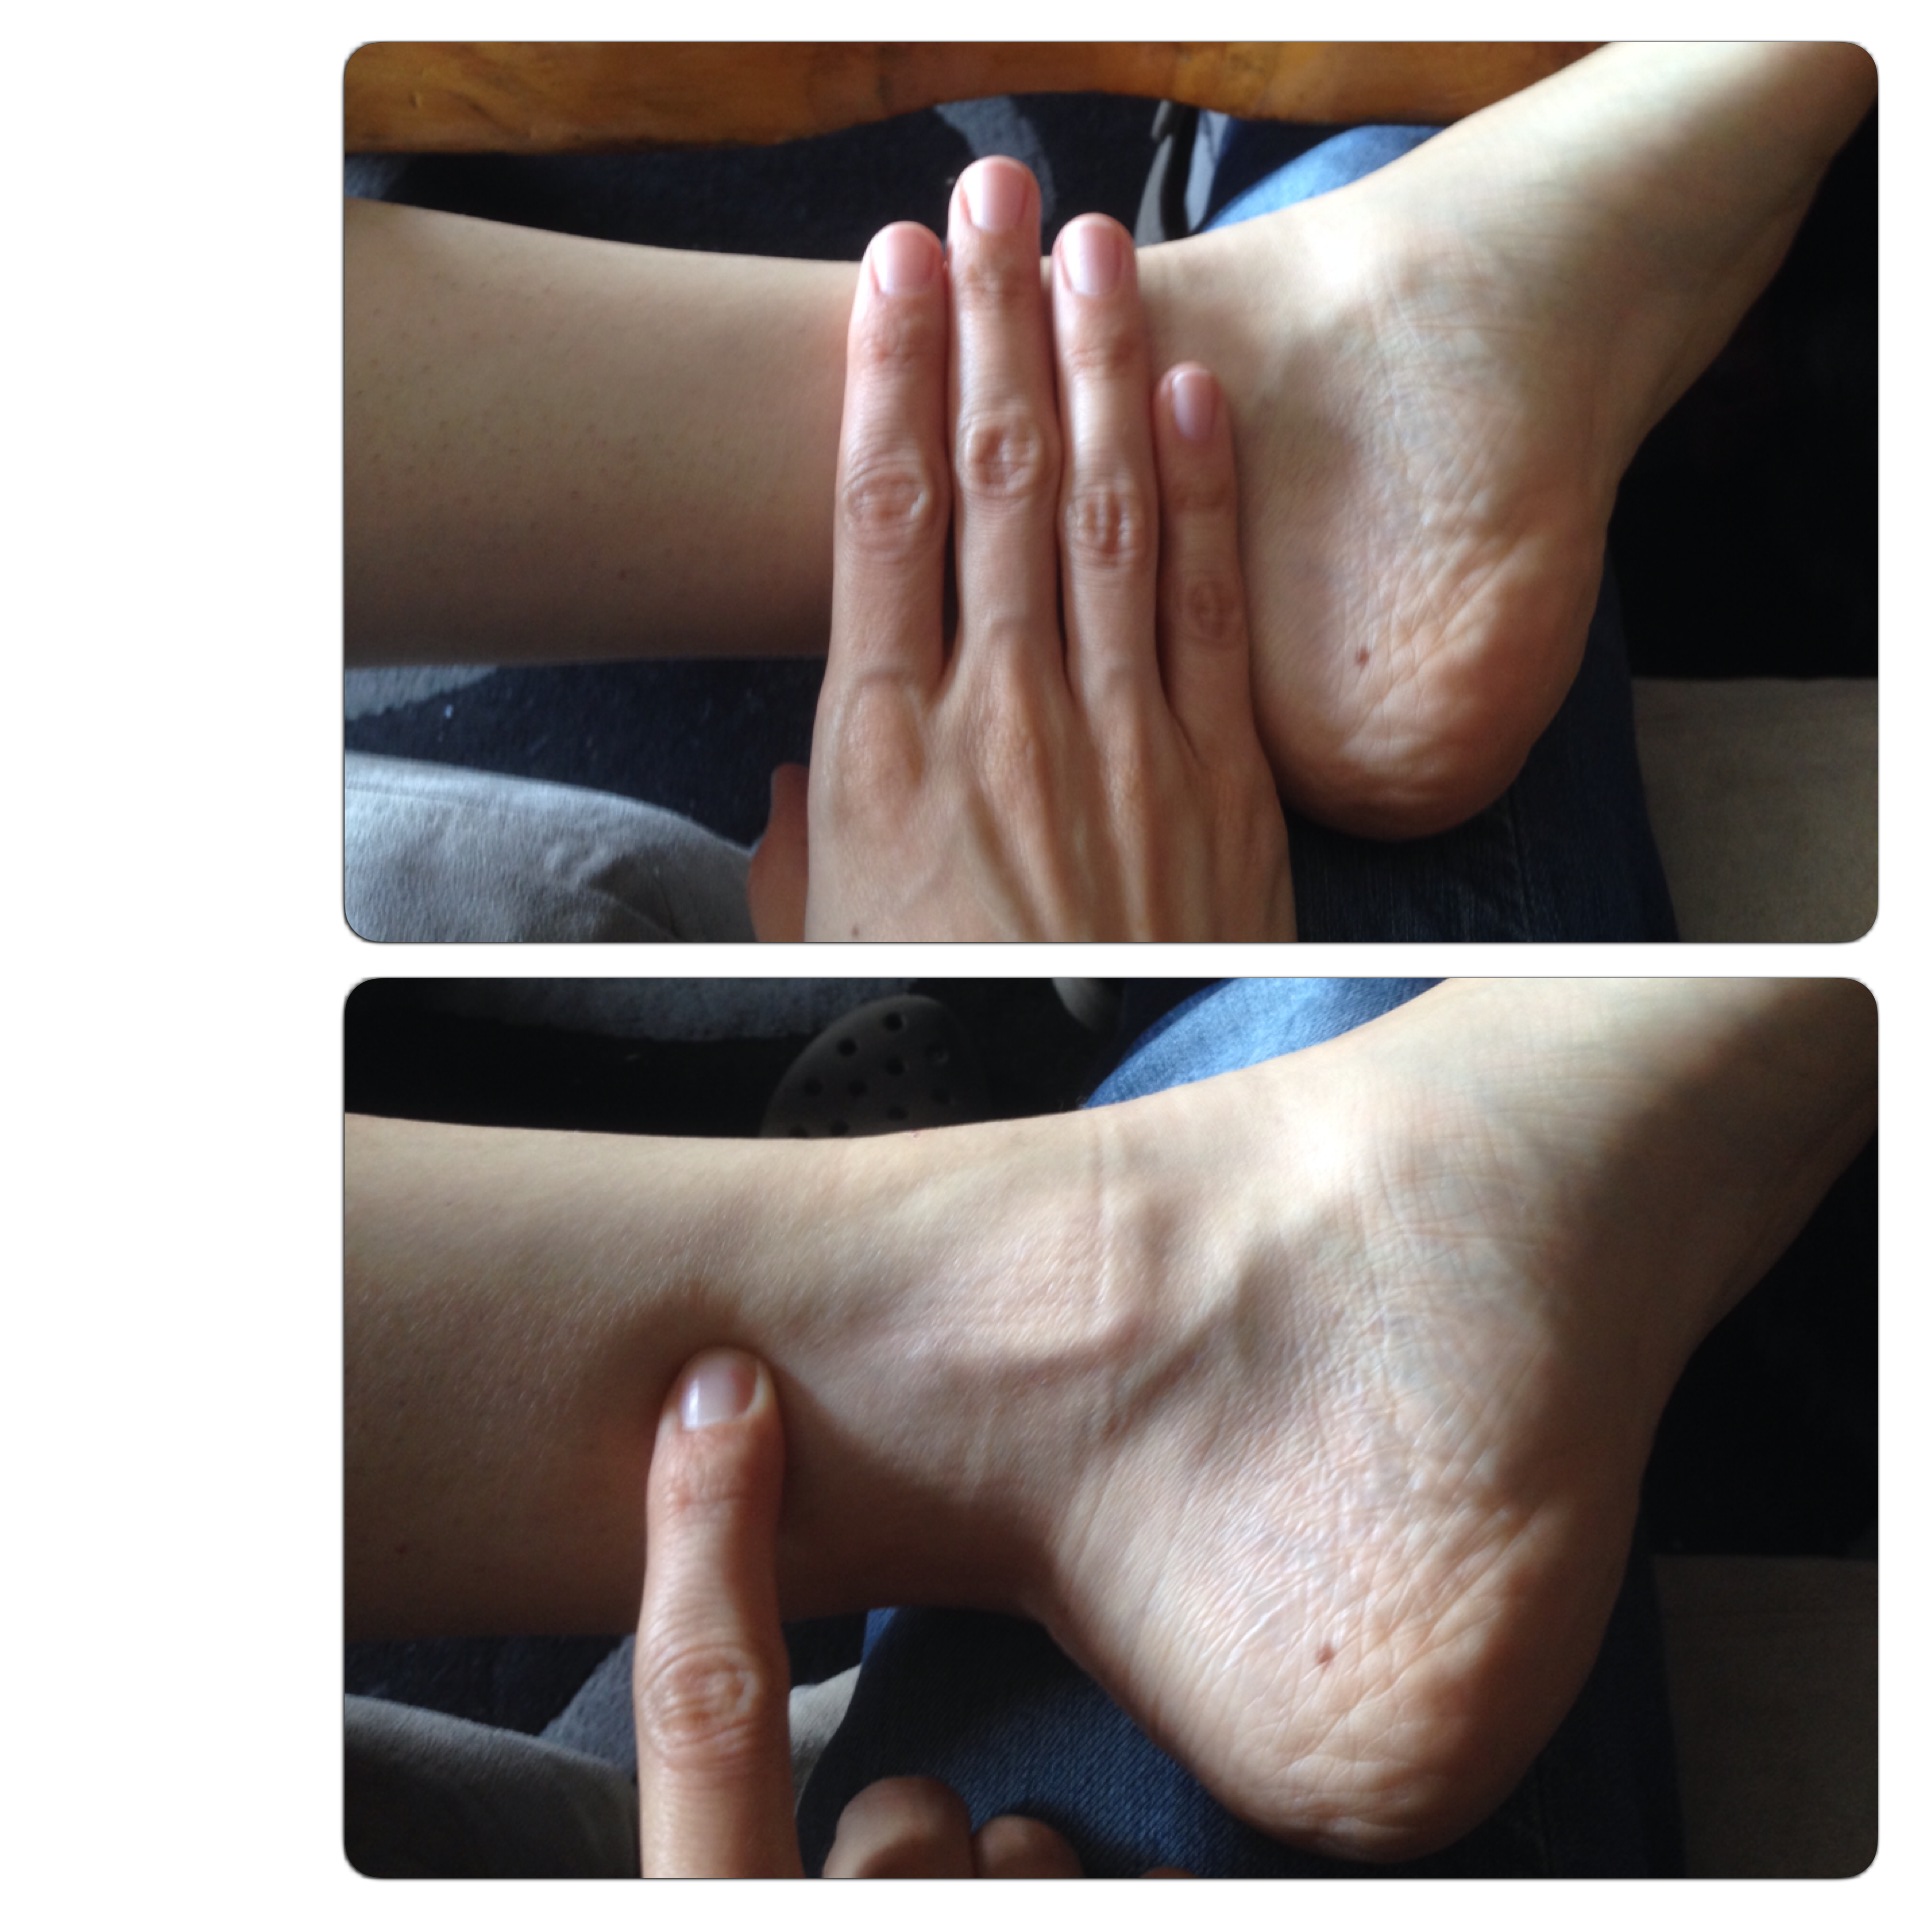
Location: On the medial aspect of the lower leg, 3 cun above the medial malleolus, on the posterior border of the medial aspect of the tibia. (4 fingers above the inside ankle bone, just behind the shin bone)
Classification: Crossing point of the Spleen, Kidney and Liver Meridians.
Indications:
Irregular menstruation, dysmenorrhea, metrorrhagia, leukorrhea, amenorrhea, mass and gathering in the abdomen, prolapse of uterus, dystocia, postpartum faintness, persistent lochia, infertility, nocturnal emission, spermatorrhea, impotence, premature ejaculation, pain in the penis, hernia, testicular atrophy
Enuresis, anuria, edema, dysuria
Spleen and Stomach deficiency, borborygmus, abdominal distention, diarrhea, paralysis of the foot, beriberi, muscular pain
Diseases of the skin, urticaria
Insomnia, headache, dizziness, bilateral hypochondriac pain
Functions: Strengthens the Spleen and Stomach, resolves dampness, harmonizes the Liver, strengthens the Kidneys, nourishes Blood and Yin, regulates menstruation, cools and invigorates the Blood, benefits urination, calms the Shen.
Notes: SP 6 is one of the most commonly used points and one of the most versatile. Because the point crosses the Spleen, Kidney and Liver meridians, it can treat many conditions associated with all three organs. It's an important point in the treatment of any digestive, gynecological and emotional condition.
*Do not stimulate during pregnancy
Keep checking back, there is more to come!